In this very special rendition of Worldbuilding Wednesday, I’m going to give you a step-by-step guide to how I made the tetonic plates for my conworld Erziyye. This guide is meant to help with designing scientifically plausible (and neat-looking), but not scientifically accurate maps. Some worldbuilders (like myself) enjoy the idea of having fairly detailed geological information on their maps but may find that after a certain point in research they start to feel like they’re beginning to understand less than before. Geology is hella confusing, to be honest. So basically, this is the tutorial I wish I’d found when I was researching this. It’s an amalgamation of things I’ve learned while reading tutorials, wikipedia articles and other web pages, looking at maps of Earth and talking to my friend-and-map-conslutant Grace (who rocks). Hopefully it will be helpful to other builders who are aiming for “plausible” but don’t feel they have that much time to spend on research. I’m going to assume that anyone who reads this has a rough idea of what tectonic plates are and skip trying to explain it, but if you aren’t familiar with the concept, here is a Wikipedia article.
So first thing’s first: does your conworld need tectonic plates? No, probably not. So why add them? Well, first of all, it’s fun! Secondly, it can tell you some interesting things about your world. It can tell you which areas are prone to earthquakes, where the volcanoes are and, as Grace pointed out, where there’s a deep, scary ocean trench for your Kraken to live in. If that sounds like stuff you’d like to know, follow the steps below:
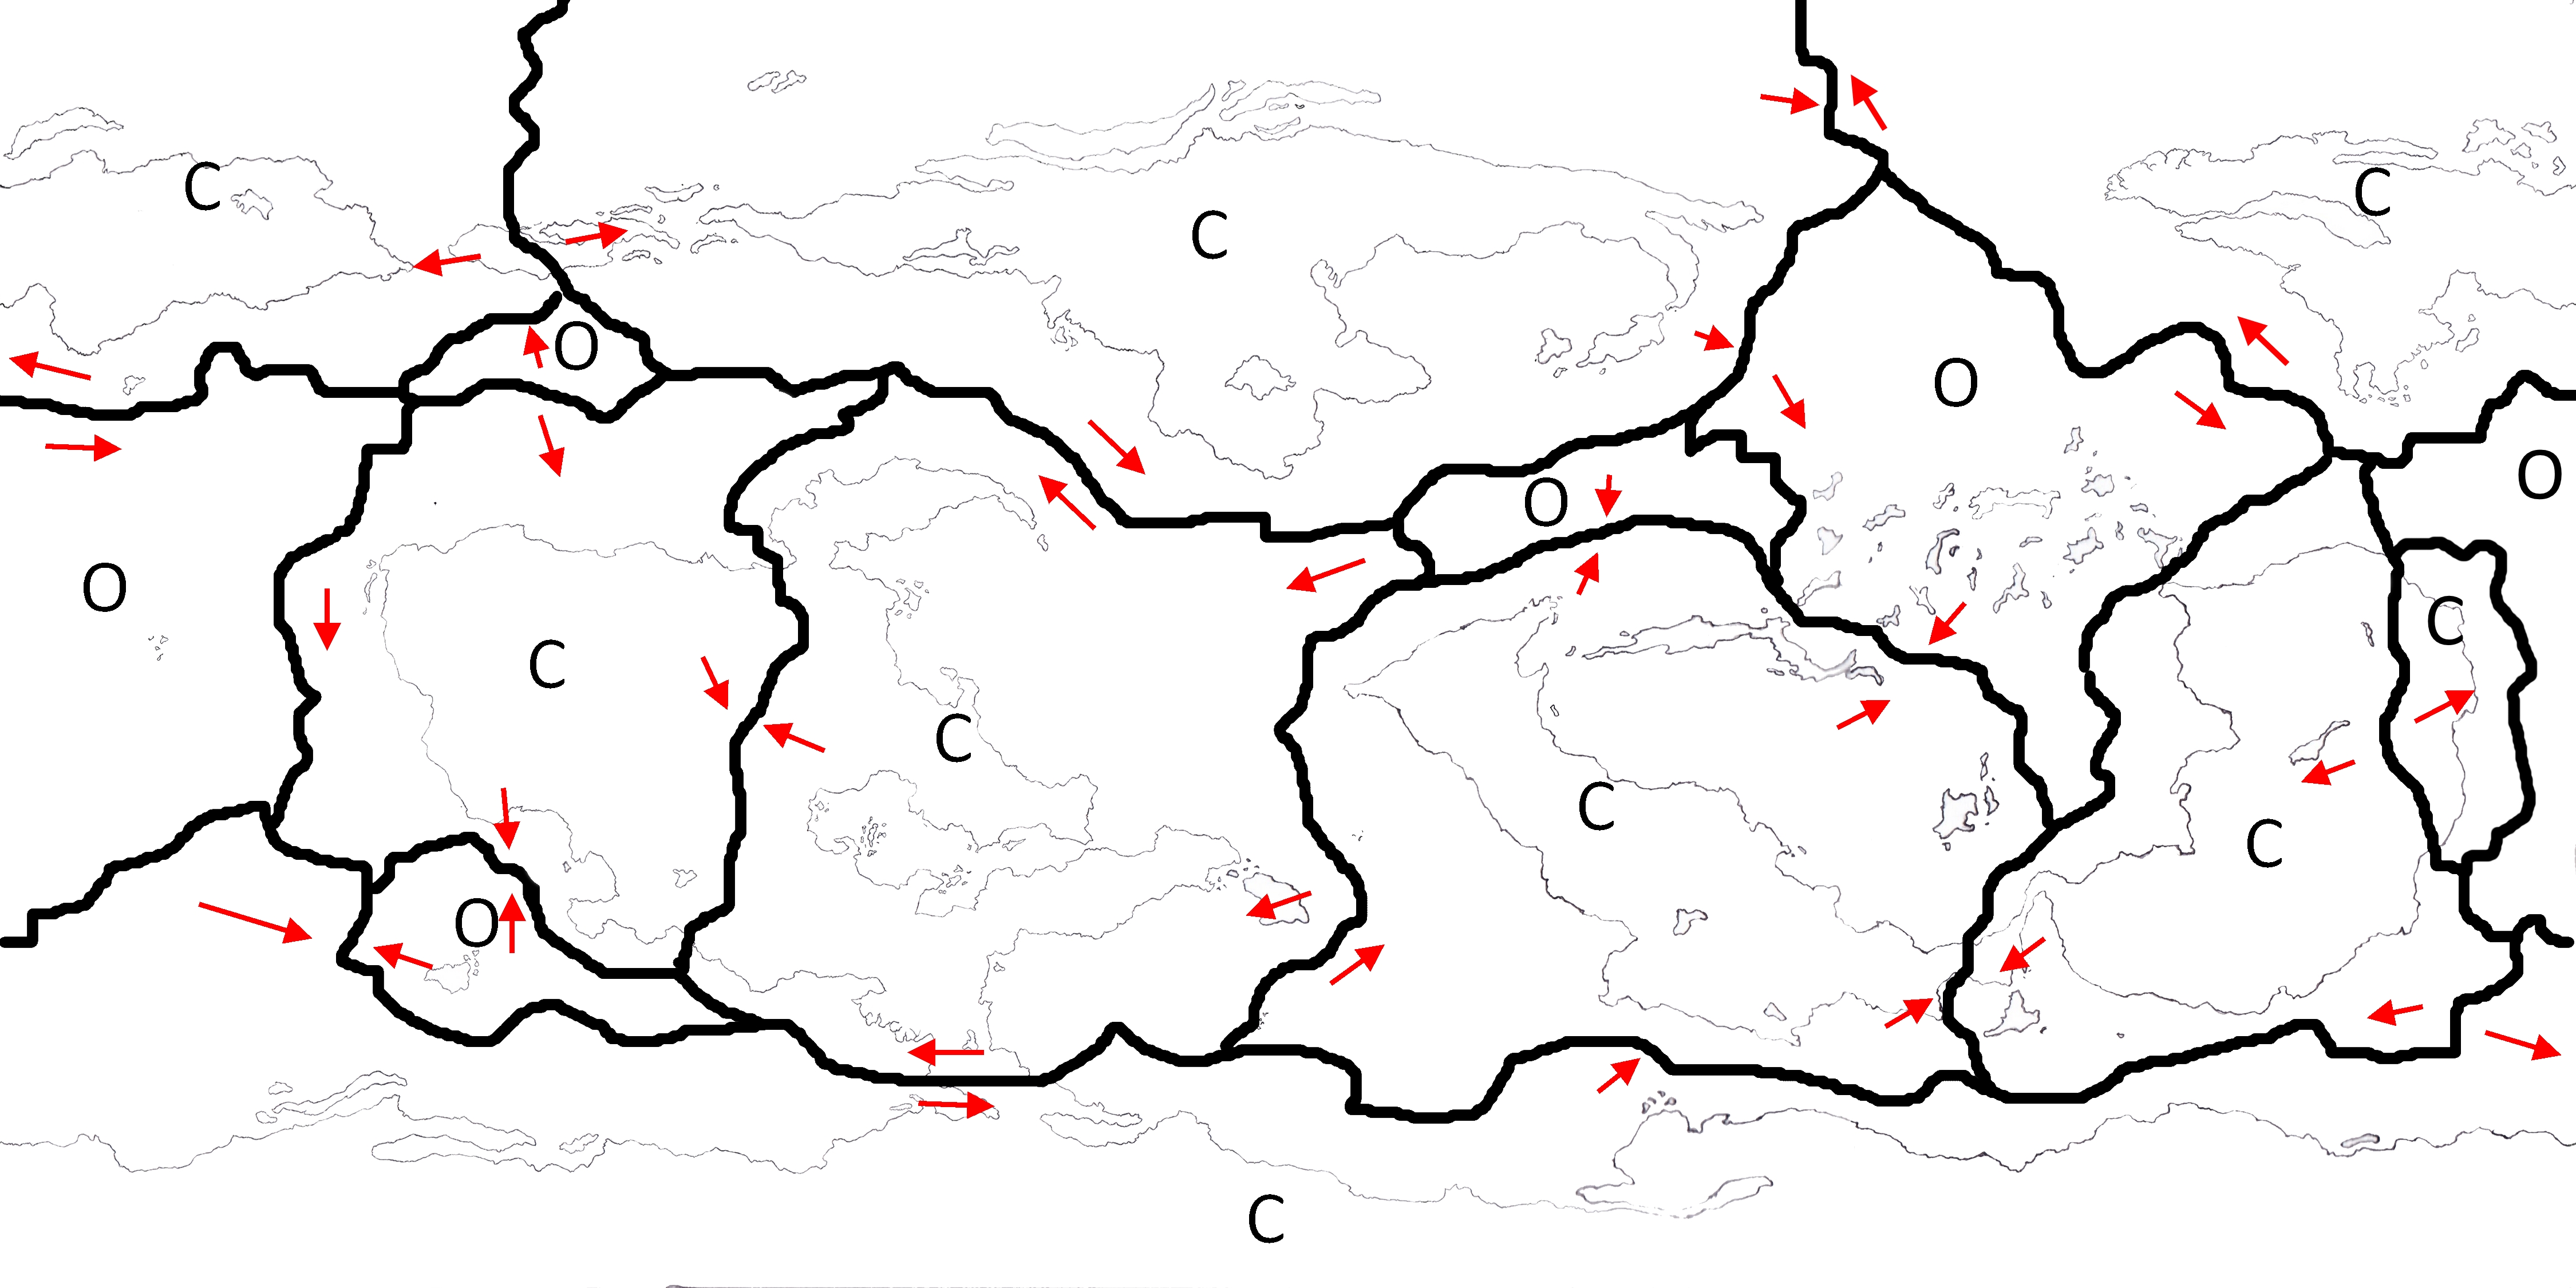
Step 1 – Have a map!
Step 2 – Draw plates! I elected to let my plates roughly follow the outlines of my continents, in most cases. I did this because a) that’s what maps of Earth tectonic plates look like and b) I didn’t want too many plate boundries on land. Remember to vary the size and shape of your plates for a realistic look. I’m working under the assumption of spherical worlds here, and from that perspective you should also keep in mind that the plates that reach the edges of your map line up. If you want to check what your plates look like on a globe, I recommend this website.
Step 3 – Classify your plates! There are two kinds of plates: continental and oceanic. What kinds the plates are will impact what effects a particular plate boundry has (more on this below). Apparently, tectonic plates can actually be oceanic in one area and continental in another, but for the sake of not confusing myself, I settled for regarding it as a binary choice, and I also settled for just going “if there’s a big chunk of continent on this plate, it’s continental, otherwise it’s oceanic”. You are of course free to do more research on the topic, but personally I found this satisfied my desire for balance between the amount of research I did and the level of plausibility my map had. I marked the two types with Cs and Os.
Step 4 – Make your plates move! All parts of a plate should be moving in the same direction. However, that doesn’t mean that your plates have to be moving straight! It can rotate, which would result in arrows going in slightly different directions, but they should be rotating the same way. Once again, you can use the website I liked to in step 2 to check if it still looks okay on a globe. I’ll note here that my arrows above aren’t meant to be precise, just approximations of the movement.
Now comes the fun part, where we find out what effects the plates will have on our map!
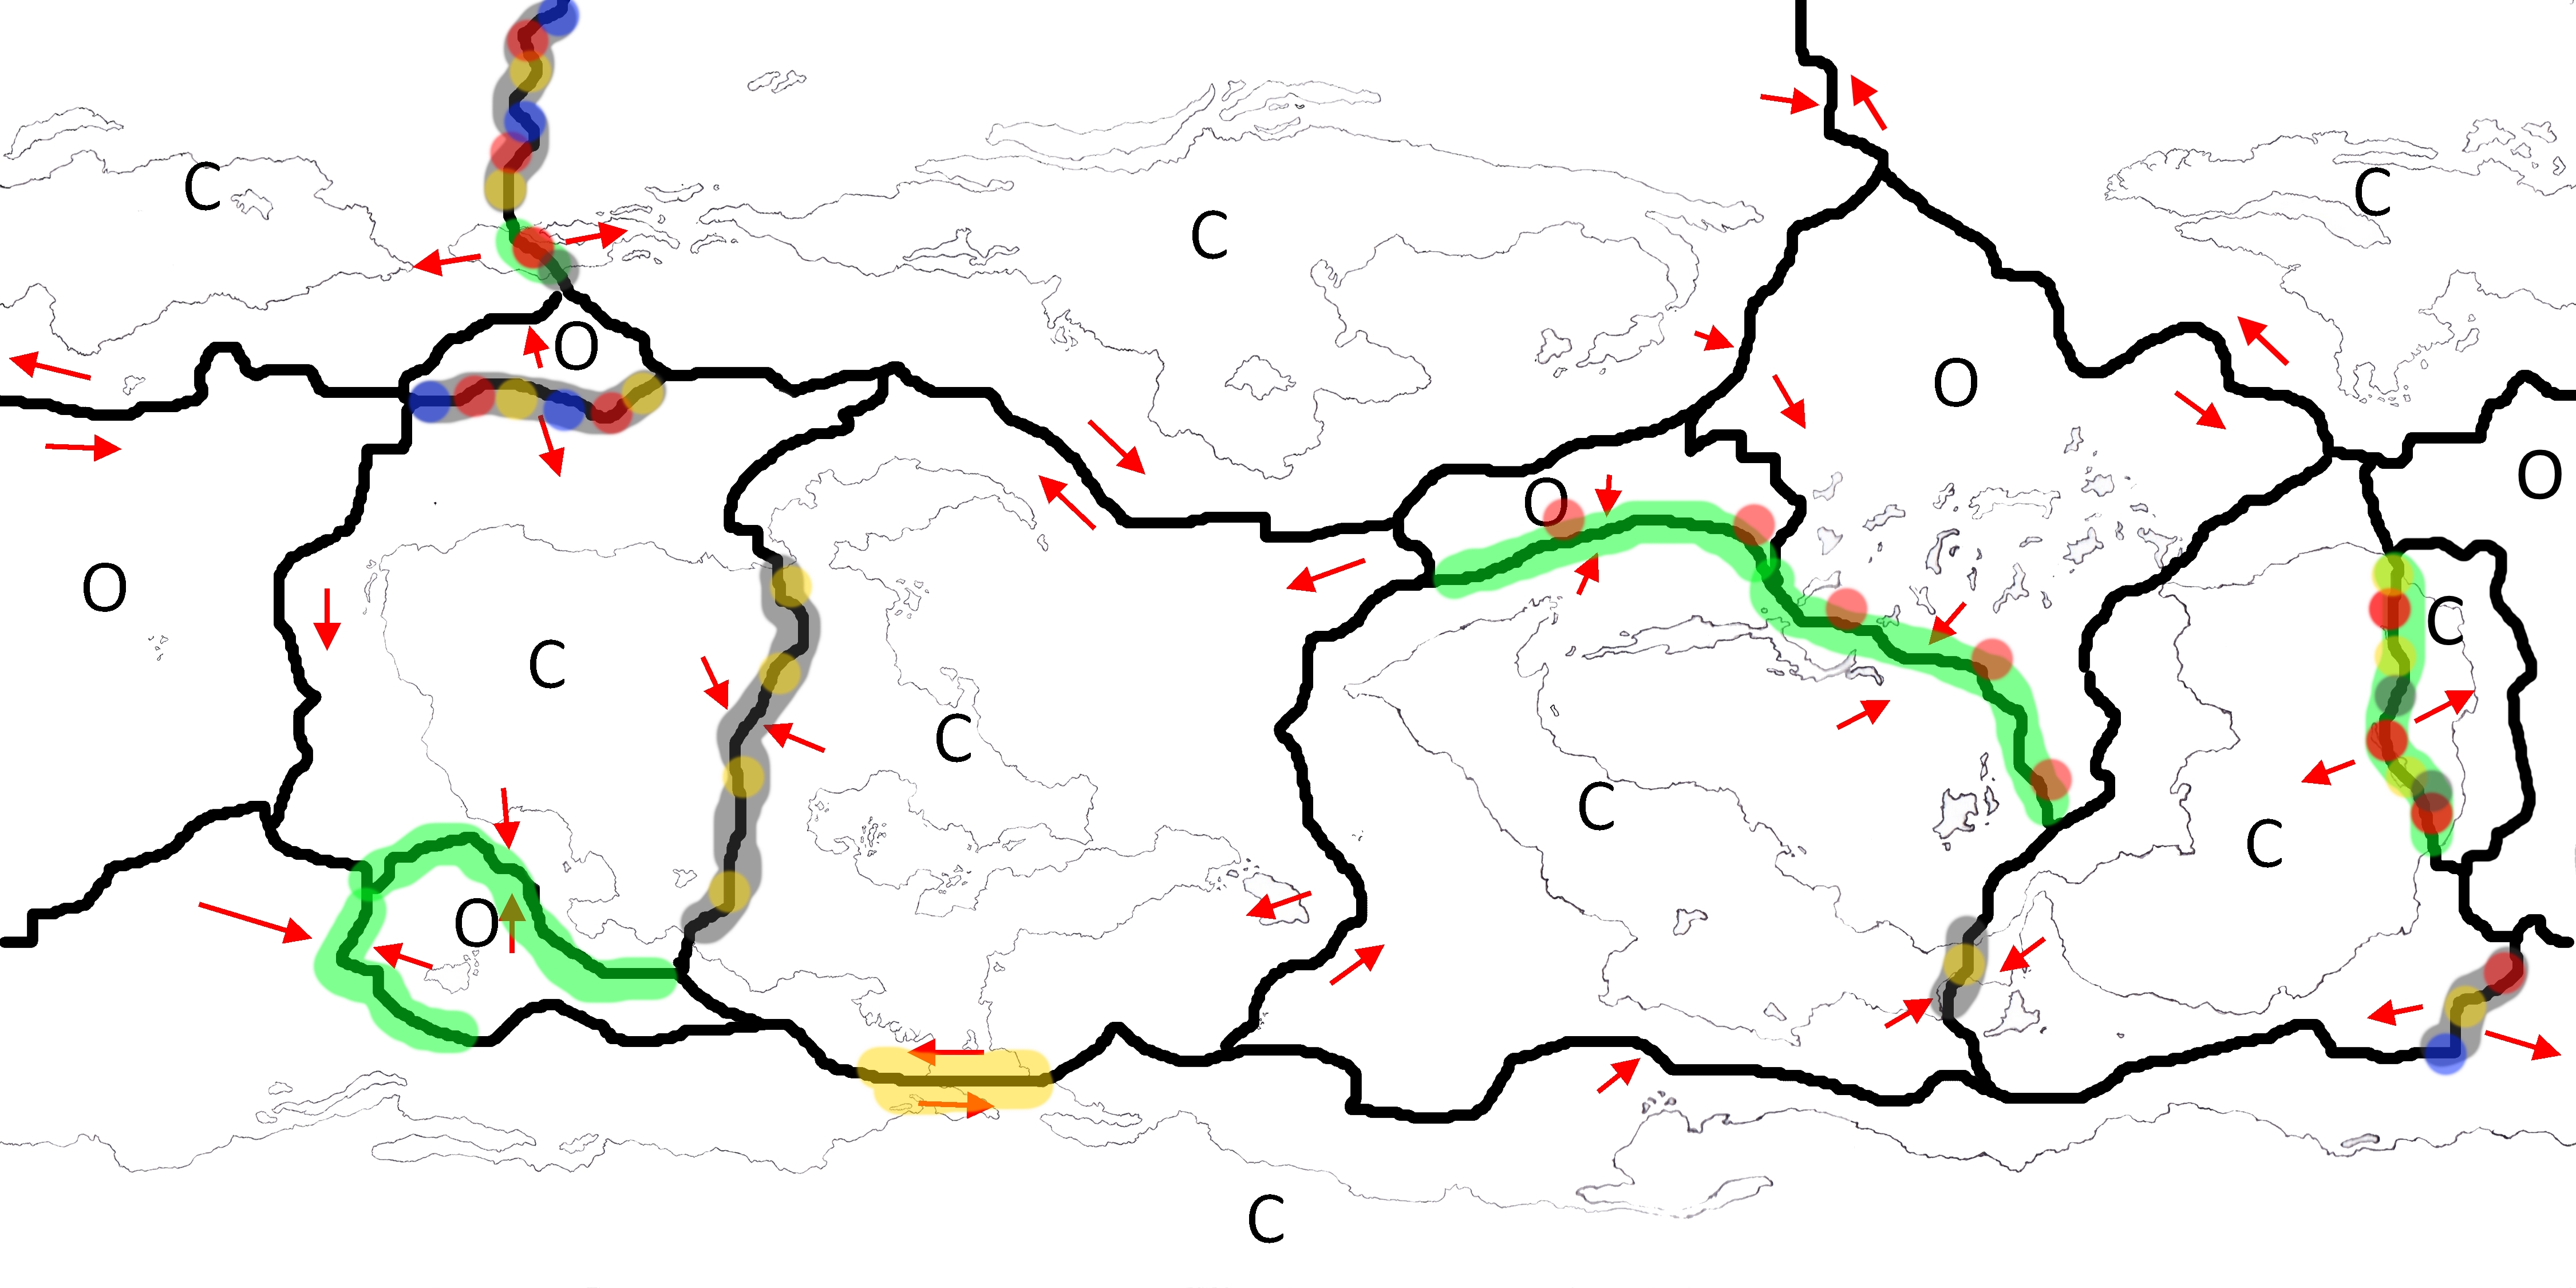
Step 4 – Add plate effects! There are three types of plate boundaries.. Below is a (very simplified) list of what effects these different types will have. You can see examples of the different effects I list below on the map above. Yellow signifies earthquakes (actually all plate boundaries cause earthquakes but I’ve marked the particularly active zones above), red volcanoes, blue tsunamis, grey mountains and green ocean trenches (in the ocean) and rift valleys (on land).
- Transform boundaries (where the plates slide past each other). These boundaries will produce large earthquakes that are very noticeable on land, but not so much so in the ocean (unless there’s advanced measuring equipment involved) as they don’t usually generate tsunamis.
- Divergent boundaries (where the plates are pulling apart). When these are in the ocean, they can produce tsunamis and cause volcanic activity, as well as create ridges and underwater mountain ranges. On land, they can produce earthquakes, volcanos and rift valleys (which may or may not be water-filled), as well as slowly build up mountains.
- Convergent boundaries (where the plates are pushing into each other). These will produce earthquakes and tsunamis. They will also have different effects depending on the type of plates that meet (hence why we classified them in step 3). This is a very simplified
- If an oceanic plates meets a continental plate, the oceanic will be forced under it which creates a subduction zone. On land, the top plate will create mountains and volcanoes, and in the ocean the meeting will create deep ocean trenches.
- If both plates are oceanic one will still subduct under the other, which will create deep ocean trenches and volcanic islands.
- If both plates are continental, they will push each other up creating great mountain chains. This will also cause a lot of earthquakes in the area.
With these effects in mind, go hunting for each type of plate boundary on your map and mark them as you see fit. I elected to mark my plate effects with different colors as seen above. The dots and lines don’t signify specific landmarks, just areas where different things are more likely to occur. I found this gave me a good overview of the situation.
Step 5 – Soak in the awesomeness of your new tectonic plates and show them to all your loved ones! Fair warning, they may not be as excited as you are. My boyfriend sure wasn’t.
That’s it! Not very hard, was it? Before I end, I also want to thank Grace (again!) and the people at Worldbuildingschool.com whose tectonic plate tutorial inspired me to add plates to my world. Their tutorial is good, this one just adds a bit more detail.
I hope you find this step-by-step guide useful! If you have any questions or comments, feel free to post them in the comment section below.
Pingback: Twice Fortnightly – Sprinting Along | Emma Lindhagen
Pingback: Worldbuilding Wednesday – Step-by-Step for Ocean Currents – Emma Lindhagen