Since my step-by-step of tectonic plates was pretty well received (and fun to do!), I wanted to do another one on ocean currents. I had intended to do it pretty soon after the first one but have been derailed about a billion times. Well, here it finally is! And like last time I have a little disclaimer: this guide is meant to help with designing scientifically plausible (and neat-looking), but not scientifically accurate maps. I don’t claim that my own maps are perfect, but they’re good enough for me and other worldbuilders looking for a similar level of plausibility might find this guide useful. Once again the guide is made up from things that I’ve read in articles about worldbuilding or science, looking at maps of currents and talking to my loyal map-consultant Grace (who still rocks!).
So, does your conworld need ocean currents? As with the tectonic plates, probably not. But it can help you figure out the climate in your conworld, and have cultural and economic implications for the societies you create (by, for example, indicating where likely trade routes would be located). Plus, it’s fun! So here is the guide:

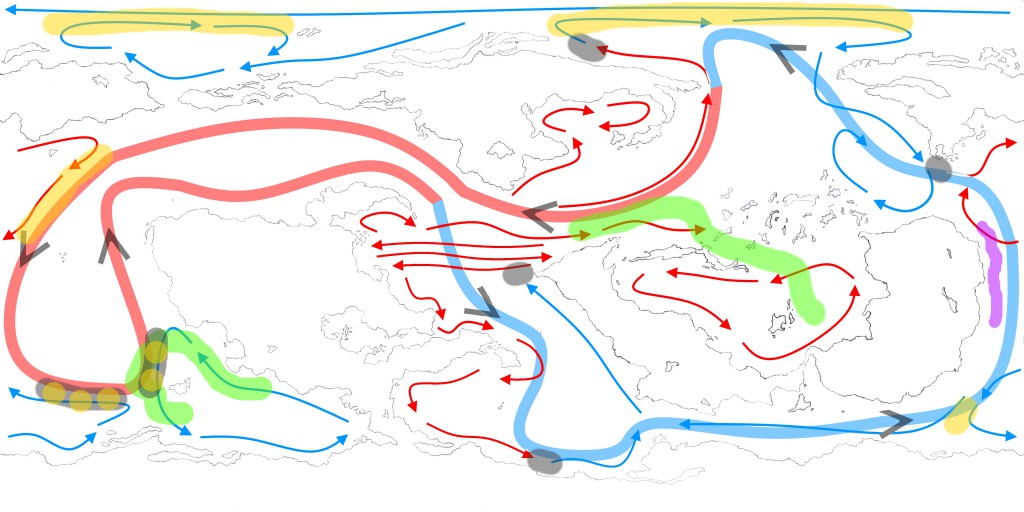
Step 1 – Have a map! Ideally, this should be a map with water on it, or else ocean currents are gonna be hard to find.
Step 2 – Draw a great ocean conveyor. An ocean conveyor is a system of deep-water circulation that moves water around your world and, from what I understand, works in at times mysterious ways. Draw your conveyor as a big loop that snakes around your ocean. If it helps, visualize it as a big rubber band. Maps of Earth’s conveyor look rather a lot more complicated than mine, but I felt it gave me enough of a general idea.
Step 3 – Mark hot and cold on your conveyor. I started by making my conveyor red, then picking two cold spots (spots near the polar regions were cold water would be picked up) and coloring everything between them blue. Then I extended the blue a little to cover approximately half of the conveyor. The cold part of the conveyor runs deep, and the warm part closer to the surface.
Step 4 – Determine the direction of your conveyor. Add some arrows to mark the direction. For this, I used the same direction that most Earth maps have with cold water going mostly eastward and hot water mostly westward. Since my planet in Earth-like, I figured that was good enough.
Step 5 – Add surface currents. There are a few things to keep in mind here:
- Currents north of the equator will turn clockwise.
- Currents south of the equator will turn counterclockwise.
- Currents will change course when they run into land, other currents or, it seems, sometimes because they bloody well want to. As for your great ocean conveyor, remember that the cold part of it is deep so it won’t interfere with surface currents, but the warm part will.
- Cold currents originate in cold areas, warm currents in warm areas. And of course cold currents can become warm as they move closer to the equator and vice versa.
From what I’ve read and heard, it seems that the reason for the exact location and direction of ocean currents is pretty dang complex and not entirely clear even to experts (but I could be wrong, obviously). Since delving into such complexities isn’t really what we’re doing here, I suggest you just get creative. Using your conveyor and your landmasses, try to spot places where you think a current would seem natural, then follow it to see where it takes you. Maybe it loops back in on itself, maybe it continues someplace else. Have fun with it! I opted to give Erziyye an equatorial current based on maps from Earth, with two westward currents running along the equator with an eastward current between them, chiefly because I thought it looked awesome. I also added a looping current around my north pole since there are no landmasses there. Then I took those currents and followed where I thought they’d lead, and most of my surface currents come from there. And remember, you don’t need to fill in every tiny current in your whole world, just the main ones. When you’re done, check the whole clockwise/counterclockwise thing, just to be sure.
Step 6 – Add effects of ocean currents. I only opted for adding two current effects to my map (mainly because I couldn’t think of anything else). Places were warm and cold currents meet, I marked as being abundant in fish (and fog!), and in places where currents go in different directions, I marked as being prone on whirlpools. In addition to this, and for ease of reference, I also marked my deep ocean trenches (from my tectonic plates map) on this map. Finally I decided I wanted a great barrier reef and added on in a spot I liked (in purple on the map below).
Step 7 – Look at your pretty map and be happy! Again, this is not a scientific method, but it should be easy to follow and give acceptably realistic results.
Like in the previous step-by-step guide, thanks to Grace and to WorldbuildingSchool.com for this tutorial which got me thinking about currents in the first place. I plan to do some more guides like this in future, but my worldbuilding is not something I’m prioritizing right now, time-wise, so we’ll see how long it takes before the next one is up.
I hope you found this guide useful! If you have any questions or comments, feel free to post them in the comment section below.
Pingback: Twice Fortnightly – Lil’ Milestones – Emma Lindhagen